(Re)Exploring Flipgrid: 3 Underutilized Features
One of the biggest frustrations for teachers who have moved online is the seeming disappearance of opportunities to have students walk us through their thinking. In a face-to-face class, we can quickly check in when we pass by students struggling with a problem, but now many of us are seeing submissions with no understanding of where they came from.
One way to help us see what students are thinking when we can’t just swing by their desk is to create a low-stakes check in system with Flipgrid.
Flipgrid has been discussed here on the TESOL blog for its great uses in teaching speaking, and it has a huge community of die-hard advocates online. One of the great potential uses is to have students show us their thought process as they are working through a problem. Over the last year, Flipgrid has announced a number of amazing features, including the use of a whiteboard with live inking, stickers and custom backgrounds, and my favorite, screen recording! Let’s look at these and see if it might be time to explore some of the features you may not have known about.
1. Whiteboard
We can use the whiteboard feature much like we do the whiteboards in our own classrooms. Teachers can provide students with challenges to draw on the whiteboard and explain the drawing as they’re going through it. In lower level classes, you might ask students to draw a circle and a square and to explain locations using prepositions. As students draw, they can talk through their understanding by speaking what they’re drawing, for example “The circle is next to the square,” or “The circle is in the square.”
Using the whiteboard is easy, too! Students simply click on “Effects,” then “Board” and choose the whiteboard. They will then use the “Ink” tool, also under “Effects.” Students can practice as much as they like before they record, and they can record in segments if they want to practice mastery!

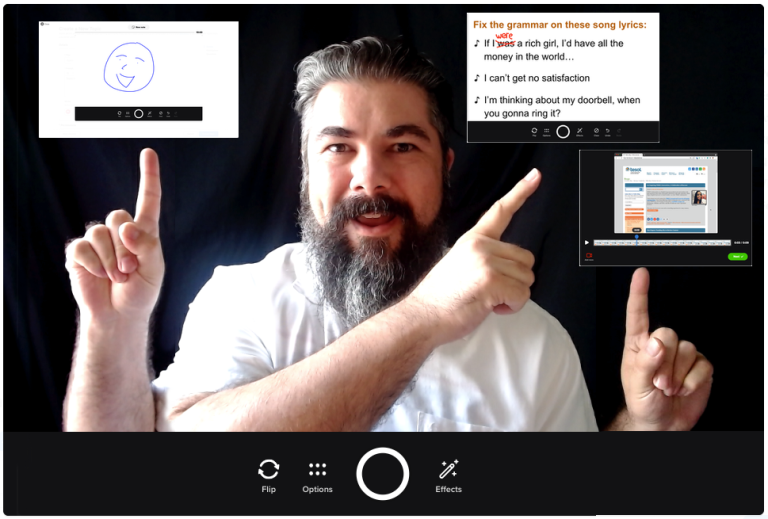
2. Annotations
For a higher level activity, teachers can provide students with an image of text to annotate. Simply take a screenshot of a sentence or paragraph with any number of mistakes and send it to your students. When they’ve created their whiteboard, they can click on “Photo” under effects. Flipgrid will prompt students to “Add custom sticker,” where they can drag the file you’ve sent to them. From here, they can use the same “Ink” feature to annotate the image, pointing out mistakes and explaining how they would fix them. Encourage your students to talk through the changes they’re making as they annotate, allowing you and classmates to see not only their final results, but also their reasoning behind their choices.
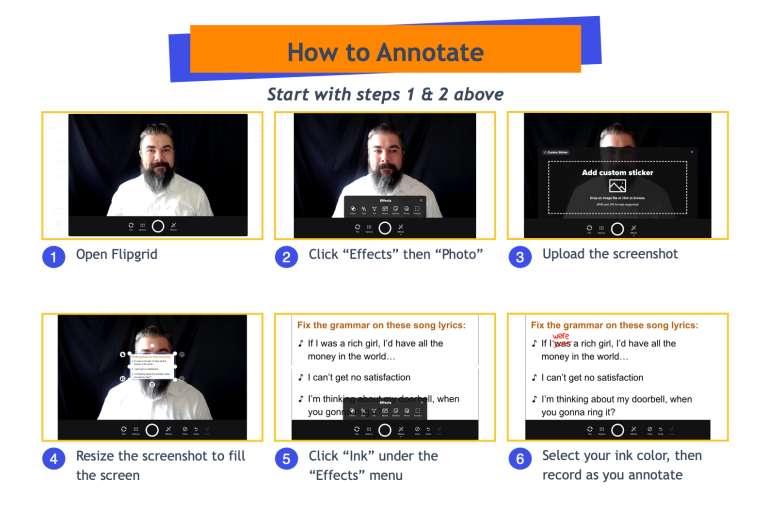
“How do I make the text for the screenshot?” you may be asking. The easiest way is with Google Slides or PowerPoint. Simply make a slide (the default dimensions are the right size, so nothing to worry about there!), then either export the slide as an individual image or screenshot it as a .jpg or .png. I recommend using a large size font (36 pt is good) so that it’s easy to read even if the image gets resized.
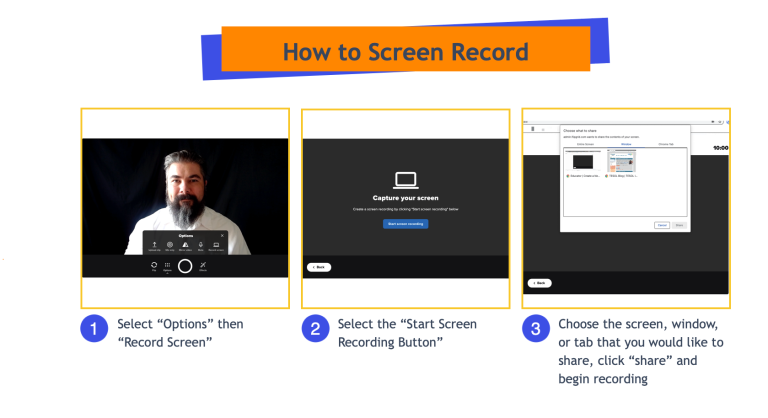
3. Screen Recording
I love the screen recording feature because it allows students to show their work outside the confines of Flipgrid. As teachers, we all pull from any resources we can find that help to get the job done, so having students show their work through the unlimited depths of the internet only makes sense. One activity that allows students to feel at ease is to have them give a “walking tour” of their favorite neighborhood in their hometown by talking us through a Street View version of Google Maps. When students share their favorite cafés and stores with each other, it helps build community and cultural understanding, too, letting us travel the world at a time when we might not be able to do so physically.
To turn on Screen Recording, simply click on the “Six Dots/Options” and then click on “Record Screen.” Students can choose from sharing the whole screen to an application’s window to a single tab from their browser—whatever fits their needs!
There are endless activities you can create to use the screen recording option, but one of the true joys is when students start to develop autonomy and begin to use it to teach their classmates how to complete activities for the class. This is where the true learning begins!
Flipping to Formative Assessment
All of these activities allow for complex language processing, and I suggest using them for low-stakes formative assessments. Flipgrid lets students re-record over and over again until they’re satisfied with their work, before they even turn it in. These are great activities to give an easy “complete” or “incomplete” and spend more time giving constructive feedback by responding to their videos, or better yet, having their classmates do so!
If you haven’t tried these underutilized Flipgrid features, give them a try! You’ll be amazed at what your students create!
About the author
Brent Warner
Brent Warner is a professor of ESL at Irvine Valley College in California, and an educational technology enthusiast. He is co-host of the DIESOL podcast, the only podcast with a specific focus on EdTech in ESL. He frequently presents on the crossroads of technology and language learning, focusing on student engagement and developing learner autonomy. Brent likes his coffee black and his oranges orange. He can be found on LinkedIn at @BrentGWarner.